Friday, November 2, 2012

12" x 12" Magnetic Memory board

Memory Board

Children's artwork is great, but it takes up so much room on the fridge, especially when it is 3-D.  So I made this memory board for my little boy to hang in his room.  He is really proud to hand up a new picture and have it on display. 

I used a 12"x12" scrapbook frame, a sheet of 12" x 12" magnet board, scrapbook paper, twine, and mini clothes pins to create this.Oh, and any magnets you want.  I plan to make more later...

Start by openeing the frame, insert your desired scrapbook paper ( I cut out his name and attached it to a tag, but left it simple other than that) and metal sheet, then close it up. 

Decorate the clothes pins as you see fit. I modge podged some coordinating paper to mine. Then clip them to your ribbon or twine.  

Attach the twine to the back side of the frame (I used a staple gun). 

Now you are ready to hang it up for your rotating gallery!

Child's Ghost foot painting

Ghost foot painting
Today's activity is ghost foot painting. When you apply the paint to your child's foot, I found it was easiest to have them step in the paint and then step onto the paper, as opposed to them trying to bring the paper up to their foot. 

Attach google eyes (can you tell I love these yet?) and you are ready to display for all to see.

Hand towels for kids

I am all about making life easier.  My kids would wash their hands after using the restroom and when I would go in to check on them/ clean up, the hand towel would be on the floor.  My solution? add a loop to the towels so little hands couldn't pull it off our towel bar. 

Now, we have two towels, the top 'adult' hand towel and the bottom kids towel that cant' be pulled off when they dry their hands in a hurry. 

Why the two towels? Well, I like things to look finished and one towel has kind of a limp appearance. Two is much better!

Cereal box conversion for a storage bin


 It occurred to me that cereal boxes are just the right size to hold our incoming bills and coupons that need to be sorted.  Our counter space is limited and it seems that our 'landing zone' for all of our paper is right where I prep dinner.  These are perfect!


  • I started by trimming down the front and top tabs off of each box
  • Next, I applied a good coat of modge podge to the front, sides, and inside of each box
  • Cover with scrapbook paper
  • I chose to embelish mine with the words 'coupon' and 'bills' on the front of each box. 
  • Finish each with a sealing coat of modge podge when the base coat is dry

Easy two-tier veggie and fruit basket

Garden Veggies!
Since our garden was really going crazy this year, we needed a place to hold all of the garden abundance.  We have been using a footed fruit tray for years, but not until the other week had it occurred to me to place a dinner plate underneath to double the storage place.  I would love to have a multi-tiered rack, but haven't made it a priority while out shopping. 

Brilliance often comes to me just before bed or while my mind is absent during showers (this is one of my few alone times without kids).  Most of my ideas and revelations come during these moments! *sigh*

Paint Pour Pots


Crafty on Mondays paint pour pots
paint drip/ pour pots

Paint pour pots are so easy to do. I had a few terra cotta pots laying around (one had a chip in the bottom), so I fixed the chip, and gave them a makeover.

Directions:

Lay down a plastic bag to protect your surface. Paper will not work as a good amount of paint is left over.
Turn your pots over and place a piece of tape over the drainage hole
Pour enough acrylic paint to cover the bottom. This will be your base color
Add colors. Each time, add just enough paint to cover the bottom. after the addition of the second/ third color, you will see the base coat start to slide down the pot. 
Keep adding the paint until you are happy with the results. 

Note: stop just before you think it is just right as the paint will continue to run. 

Place the project outside to dry and it will be ready to use in 24 hours.

Making the most of space... Closet wrapping station

 Is Santa coming to your home in a few months?  Well, he would appreciate it if he could find the wrapping paper.  I used two IKEA 24" towel bars mounted to the inside of a linen closet door to support my wrapping station.
Then, I used "s" hooks from IKEA and binder clips to hold the wrapping paper. Be sure to clip the paper so it doesn't unravel.

Down below is where we are stashing the bows and ribbon. The baskets were both from IKEA (I love that store for affordable storage options).

I did use an extra hook to hang our gift tags behind the bows against the door.

Price breakdown:

2- 24" towel bars: $2.49 each
1- white office bin - $2.99
1- package of "s" hooks - $1.99
1- wire basket - $5
1 - package of binder clips (I had these on hand)

Potluck Cauliflower Sheep

Crafty on Mondays cauliflower sheet
Cauliflower Sheep
Are you looking for a snack to take to a potluck, but are tired of the usual veggie tray? How about making sheep out of cauliflower? I used toothpicks to attach the heads to the body florets.  Mmmm!

My kids actually ate one since they were so darling! Score!! I might have to make these for dinner too.

Halloween bathroom decorations

Crafty on Mondays bathroom decorations
Our bathroom needed a little personality for this holiday season, so I whipped out my Cricut and made the silhouette for the mirror and the spider to suspend. I used black ribbon as his 'web' and attached it to the vanity light to make the spider look like it was descending down.

I think it turned out great, the 'Trick or Treat' letters do look better when viewed from straight on, but as to not get myself in the picture, it appears as if the letters are doubled, but it is only the mirror.

Egg Carton Bats.

Egg crate bat
 You will need:

  • an egg crate
  • scissors
  • pipe cleaner
  • black paint
  • paint brush
  • glue
  • google eyes
This was a cute way to use up some of those egg cartons we had lying around. You can also do this with an 18 count carton, but we only had 12 count.

Start by cutting 2 cups off of the egg carton and let your kiddo paint them all black. Let dry.


Then, have them choose how many eyes they want. I know two eyes are traditional, but we had a few 3 and 4-eyed bats :)

Glue the eyes in place and string the pipe cleaner through to hold it up. 

Hang and enjoy!

Quick preschool fingerpainting and leaf matching

Finger painting at the Park
For this activity, I wanted to teach my kids that leaves come in all colors and so we mixed blue and yellow finger paint and then went on a hike to find leaves.  On our adventure, we found bluish holly leaves all the way to yellow-green ginko leaves.  The lesson was that not all leaves are green and we matched the found leaves to the colors on the finger painting. 


Altered workout tee


I have a ton of shirts that I have gathered from one event or another, so with this one, I decided to cut it up!

I started by slicing the sleeves off above the hem
Then, cut the bottom band of all the way around the shirt
I then took the long bottom loop and tied it between the shoulder blades in back.
Finish off with a bow or knot and you are ready to go. 

note.. next time, I won't tie the back so low. Maybe stop after 3" or so; that way the shirt isn't so tight under your shoulder blades.

Sweet hand bats, so cute too!

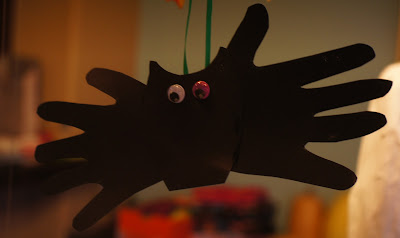
 This bat project is perfect to document your little ghoul's hand prints from year to year. I used black cardstock, ribbon, and buttons/ google eyes, traced my kid's hands and then assembled. I can't wait to have a gallery of bats to look back on in a few years.

Thursday, November 1, 2012

Paper Mache ghosts

These paper mache ghosts are really simple to make, they just take some drying time.  I used upside down juice glass as the form and painted the ghost white. The challenge for me was to get a scary face. All my faces came out way too happy :)

Fall is in the air!

I know this is after Halloween, but have you started to decorate yet? Fall is a season that is one of my favorites and you can easily transition from Holiday to holiday using a few 'swap outs' For me, I leave the gourds and swap the 'trick or treat' sign for one that says family. The Halloween lanterns get put away and candlesticks will take their place. A perfect transition using most of the same pieces.

Spooky Lamps

Using my Cricut machine, I cut out two spiders and the word "Boo" and tapped them to the inside of my lampshades. The result is a shadow shape that glows through the shade.  Cool huh?

Tiny bathroom toothbrush holder

For this project, I used an old baby wash bottle, sharp scissors, spray adhesive, and scrap fabric.

It is pretty straight forward, cut it out, use spray adhesive to cover the bottle (you could use a ketchup bottle, or another shampoo bottle instead). Please don't use the spray adhesive on the floor inside your house. I did and now I have a residual ghost ring of dirt that will always return! Then cover and hang!

Easy!

Covering a kids IKEA play table

Crafty on Mondays kids tableCrafty on Mondays kids table I saw the idea of covering a kids table on Pinterest and didn't quite see what I was looking for, so I created my own.  I used a plain green square of wrapping paper, a sharpie marker, and clear contact paper to hold it all in place. 

Viola! And now my kids have a fun way of learning where the silverware goes when setting the table! 


Thursday, August 9, 2012

Whole wheat applesauce zucchini bread

Fresh from the garden applesauce zucchini bread

Ingredients

  • 3 cups flour (I use 1 c. oats, 1 c. whole wheat, and 1 c. white flour)
  • 1 teaspoon salt
  • 1 teaspoon baking soda
  • 1 teaspoon baking powder
  • 3 teaspoons ground cinnamon
  • 3 eggs
  • 1 cup applesauce
  • 2 1/4 cups white sugar
  • 3 teaspoons vanilla extract
  • 2 cups grated zucchini
  • 1 cup chopped walnuts

Directions

  1. Grease and flour two 8 x 4 inch pans. Preheat oven to 325 degrees F (165 degrees C).
  2. Sift flour, salt, baking powder, soda, and cinnamon together in a bowl.
  3. Beat eggs, applesauce, vanilla, and sugar together in a large bowl. Add sifted ingredients to the creamed mixture, and beat well. Stir in zucchini and nuts until well combined. Pour batter into prepared pans.
  4. Bake for 40 to 60 minutes, or until tester inserted in the center comes out clean. Cool in pan on rack for 20 minutes. Remove bread from pan, and completely cool.

Octopus Watercolor

Painting renominates my soul and after having kids, this is one of those hobbies that takes space and time.  Both of which, I don't have very much of.  Just wanted to share what I have been working on.

Quick set cement hand print tiles

Oregon summers are the best! While at the beach, we mixed up some quick set cement and made hand print tiles on the sand.  

Start by mixing the cement the thickenss of pancake batter
Pour onto leveled sand
make your hand print impressions
decorate with found treasures 

Ours was dry to take home in 2 hours, but fully set by the end of the day. 

Garden helper


One of my favorite things is kids playing (and helping) me dig in the dirt.  Thanks Little Helper!

Literary Baby Shower

 My girlfriend lives on a farm property and is a teacher, so for her baby shower, we combined the cute spring animals with books. I cut up vintage primary readers and made them into garlands by sewing the cut out circles into a chain.

 Here is the buffet spread.


Does this project look familiar? The baby's name starts with R and what better a way to greet her arrival than by a book wreath with her initial! 


 I made book flags for each croissant sandwich.  It turns out that of the flags I made (triangles of book print glued to a toothpick), some, well, most of them, were of a steamy and rather trashy romance novel. Ha! It was great to read each snip-it of text aloud while fawning over pink baby clothes. 

Water Wall of recycled containers

At the farm summer camp my kiddo went to, they had this awesome water wall. They really encouraged the kids to get messy and learn through play.  What an awesome way to clear out those cupboards and make something magical for your kids. 
 My kid's birthday party has long since passed and wanted to post a picture of the invite I made for them.  Using scraps of leftover scrapbooking paper, I printed this phrase onto tinted computer paper and adhered it to the base scrap of paper. 

Fairy things and dragon wings or super hero gear,
We want to see you dressed up when the birthday time draws near.
Here is where the fun will be, please come, stay, and play
So join Liam and Macey to celebrate their super great big day.

I then used a 1/4 of a circle for the cone and two pom poms for ice cream scoops (bead sprinkles of course) and stuck that through the upper left corner for some DIY dimension. 

Using Celery Stamps

I believe that it is great just to use the items around you as inspiration for artwork. For this project, my kids and I cut off the base of a celery bunch, dipped that in red paint for the rosette and used the left over stalks dipped in green paint as the leaves.  It was a really easy project  and the rosettes were perfect as "I'm thinking of you" cards for the Grandparents.

Monday, July 30, 2012

Helping a friend with a birthday party

 Today, I am helping a friend put together a birthday party for her little man.  These are my inspiration pictures and I will post the finished results once the party is over.  Happy crafting for a pirate party!